How to copy your course content to a new shell
- Navigate to the course you want to copy the content INTO – the target course.
- Make"Course Videos" hidden by clicking the menu button (
 ) and selecting "Hide Link". If you do not see the menu button ensure that Edit Mode is set to ON at the top right of the screen by clicking the word Off.
- Delete all the side links on the sidebar, with the exception of "Course Videos" which should be hidden. Start from the bottom. Do this by clicking the menu button (
 ) next to each item and selecting Delete > Delete this menu item > Delete.
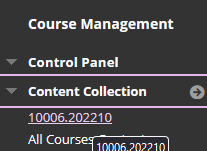
- Now that the course menu only contains the hidden course video link, look below under Course Management and click Content Collection to expand its menu. In most cases there will be a number directly under the words content collection which is the unique identifier for the target course. In some cases, mainly with merged super-sections, the ID will instead be the same or similar to the course name. Examples of both can be seen in the images below.


- Best practice is to highlight this identifier and right-click then select copy (or ctrl + c) it to your clipboard without including any spaces at the beginning or end. The ID needs to be exact or it will not work for the copy, worse you could send content into the wrong course.
- Now that you have the target course ID, enter the course that you are copying FROM – the source course.
- From the Course Menu, select "Package and Utilities" > "Course Copy"
- Under "Select Copy Type," select "Copy Course Materials into an Existing Course"
- Under "Select Copy Options," paste the Course ID for the Target Course (the course being copied INTO).
[The Course ID is made of the CRN and the Term Number. (For example - 12345.201630). If the course is a Super Section, you can find the ID by clicking "Browse" for courses.]
- Under "Select Course Materials," click Select All to mark all the checkboxes.
- Under "3. File Attachments," select the third radio button that reads "Copy links and copies of the content (include entire course home folder)" and THEN click "SUBMIT" to start the Course Copy.
- Click Submit.
- Navigate back to the target course
-
Make the course AVAILABLE:
In the Course Menu, select "Customization" > "Properties" > "Set Availability" select the Yes radio button, click Submit.
-
Change the Course Open date to the start of the semester date:
Under "Set Availability", change "Set Course Duration" to the semester START DATE. Leave the END DATE blank. Change time to 12:01 am
-
Set the "Course Homepage" as the Entry Point:
Return to the "Customization" tab and select "Teaching Style." Make sure Course Homepage is selected as the entry point.
- Continue the following steps in the TARGET COURSE after the Copy has completed to set Permissions.
- In the "Course Management" menu, click on the "Content Collection"
- In the "Content Collection" section, click the COURSE ID. There should be a folder called "course_files." If there is no "coures_files" folder, create one and move the entire contents of the "Content Collection" into this folder.
- Next to the "course_files" folder click the "Permissions" icon (looks like a hand holding a sheet of paper).
- Select the gray button labelled "Select Specific Users By Place" and choose the "Course" option.
- On the next page, scroll to locate the Course ID for this course and check the box next to it.
- Under "Roles" select "Student"
- Under "Advanced Folder Options" select the "Overwrite" box.
- Click "Submit"
Related Articles
How do I edit Course Content?
All course content items, including assignments, tests, discussions, and other lesson content will be located within the Module Content Areas. These will usually be linked in the sidebar and named according to each module lesson. Though content is ...
Creating a New Turnitin Assignment
These instructions are for creating a new Turnitin Assignment. If you are trying to re-create your already existing old Turnitin Assignments with the new LTI, see the Turnitin Re-creation article. 1. Navigate to the module where you would like to add ...
How do I add Red Shelf to my Course?
Add a Red Shelp tool link in Blackboard If an instructor would like to add a link within a content area, follow these steps: To add RedShelf to your Blackboard Learn course, select the Content Area where you’d like the RedShelf tool link to be added. ...
How do I send an email or course message?
Sending an e-mail 1. Open your course 2. Scroll down to Course Management 3. Click Course Tools 4. Click Send Email 5. Choose who your recipients are going to be 6. Type your email and click submit. Note that only the names of recipients will show ...
How do I add the Discussion Tool to a Course?
The following will detail the steps for adding a Discussion tool link to your course menu. 1.) Click the "+" sign at the top left-hand side of your Course Menu and select Tool Link from the drop-down menu 2.) Type the name you'd like to be displayed ...
) and selecting "Hide Link". If you do not see the menu button ensure that Edit Mode is set to ON at the top right of the screen by clicking the word Off.
) next to each item and selecting Delete > Delete this menu item > Delete.